Showing posts with label diy. Show all posts

Saturday, July 20, 2024

More tackle talk

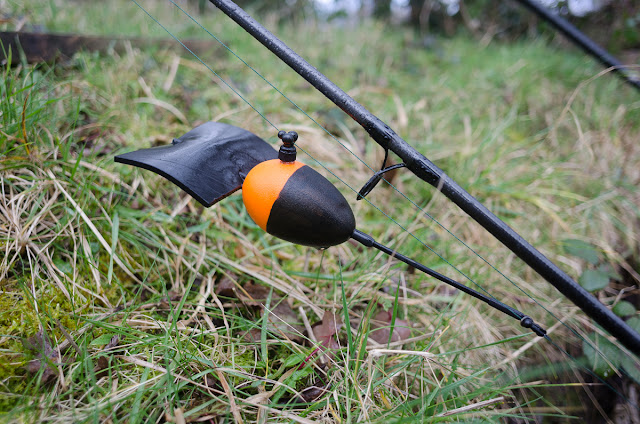
For a few years now I've been using leger stems for my eel fishing. I know full well that when the line is tightened they don't stand upright, but once the line is out of the clip they do, which might help the line flow more freely. The way I've been making them is quite simple and so far has withstood casting using two ounce leads. I've tried pulling them apart with my hands and failed so I tested one to destruction using a spring balance which had stretched to eleven pounds when one swivel parted company with the stem.

All they take are a couple of large eye swivels, a rig clip, a length of stiff boom choosing, a buoyant body of some sort and some glue-filled shrink tube.


Squash the small eye on a swivel and the large eye on the other. Clip the lead clip to the now small eyed swivel. Slip a piece of shrink on to the boom tube, fit the squashed eye of a swivel into the end of the boom tube, slide the shrink over the swivel body and heat with a heat gun. Push the boom tube through the buoyant body and repeat the swivel attachment at the open end. Push the buoyant body up and the job's done.

Eel fishing is a frustrating pastime and it always gets me thinking. My first tackle modification spurred on by an eeling problem was brought about by my ineptitude at getting the wriggling buggers in the landing net at the first attempt in the dark. I can never see where the net cord is and far too many times I've lifted the net before an eel has been right over it. Give them an inch of tail over the cord and they back out!

I should have thought of the obvious answer years ago. Paint the last eighteen inches or so of the landing net arms white. For good measure I put a wrap of reflective tape at each end of the paint, then applied epoxy rod varnish over it all for protection. So far I haven't had to make any second or third netting attempts.

My second tackle development was to solve the rig storage issue. Coiling hooklinks in grip-seal bags is OK with wire which springs straight, but the hard mono links I use with worm baits takes on a curve. I had been putting a few in a stiff plastic hook packet. They had a tendency to tangle and I thought there must be a neater way. 

Being old I dredged up a memory of an article in a 1970s about using a cigar tube to store hooklinks by putting the hook over the open end and tucking the other end under a rubber band. I found some plastic tube and gave it a try. It was OK but the rubber band was a fiddle to use and the swivel or loop ends flapped about if they weren't all the same length.

Lateral thinking came to my rescue and I tried a piece of scrap Duplon rod handle material and may pins as used on many a flat rig board. The Rick Stick was born!


 I could just about squeeze 20 hooklinks onto the 'stick'. While I considered putting it in a tube for protection it fits neatly enough in my tackle box without.
 
 
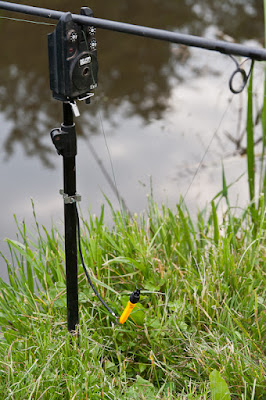
Finding it awkward using my lightweight bobbins (see here) by attaching them to the uprights of the rod pod my current venues force me to use, as the swims are not bankstick friendly, I wanted to adapt the pod so the bobbins were attached directly below the rear rest heads.

I didn't like the price of the commercially available fittings intended for this which attach between the rest head and the buzzer bar. They didn't look very long either. No matter where I rummaged there was nothing to be found that I thought could be adapted for the purpose. Staring at the pod one night hoping for an indicator to move it struck me that the bobbins didn't have to be attached to an upright. A cross bar would do just as well.

I have lots of old banksticks in various stages of decay. One was cut to a suitable length and temporarily fitted to the pod using a couple of hair bands. In practice the hair bands weren't up to much but they let me prove the concept worked. Which it did.

I tidied up the cross bar by wrapping black insulation tape around it and fitting a plastic cap to each end. A couple of Terry (tool) clips were attached using self-tapping screws so the bar can be moved up and down and removed altogether when not required. I would have used nuts and bolts but I had none suitably long. If the screws fail I'll have to get some.


In practice the set up works well. An unexpected bonus is that by turning the clips that the bobbins are attached to round the cross bar I can finely tune the indicators without having to fiddle with the reels. Neat. It's also occurred to me that by attaching the cross bar to the front of the pod I can use the indicators on a drop of almost twice the length of the cords should I want to.

The final (?) mod to the bobbin set up was to acquire some better cord. Entering '1.5mm braided cord' into Google soon tracked some down and had 5m winging its way to me. A big knot in one end to stop it pulling through the hole in the Terry clip and a piece of the magic glue-filled shrink at the other to form a loop to take a clip and everything was complete. The bobbins did their job again, dropping off and the eels taking line freely. As usual my conversion rate was pitiful!


I wonder what I'll be tinkering with next?

Saturday, July 13, 2024

Back to basics

Over the last dozen or so years of my intermittent eel fishing I've tried all sorts of bite indication set-ups (apart from float fishing). I started out fishing open bale arms using light weight rear drop-offs with the Gardner clips I use for pike fishing. Then I tried the same bobbins at the front on a long drop and baitrunner engaged just in case.


Next it was short drops and heavier bobbins sometimes even straight off the 'runner with no bobbin. All worked to a degree, all failed to a degree. I know that the 'Rollover' indicator is supposed to be as resistance free as you can get. But have you seen one, let alone tried to set three of them up on a rod pod? I was given one and can't fathom out how the bloody thing works - even after watching a video! Another over complicated angling solution.

One evening when the eels were taking a couple of 'clocks' off the baitrunner I had a flashback. Way, way back my eel bobbins were a short length of balsa dowel with a hair grip glued in one end and a screw eye in the other. On the ends of the hair grip prongs were glued plastic beads. They'd started life being used off the front rests as old school bobbins for tench after I got fed up of Fairy Liquid bottle tops! I couldn't remember having dropped runs using those. I'd actually found them a few weeks previously.

 I reckoned they worked because they were lightweight and that meant the clips didn't have to be set very tight to prevent the bobbins falling off the line. This has always been how I like my drop-off bobbins. The trend in pike fishing for heavy bobbins to show slack line takes results in the clips having to be tight, offering more resistance on the more common run. Drop-back indications have never been much of a feature of my piking, and even less of my eel fishing. If you use cord to attach the bobbin to the rear rod rest you can see a slack liner even with a light bobbin. That's another story though.

I was sure I could make a more modern version of this indicator if I could find the right components. The clips would be the hardest part. Map pins are too short. What about hat pins? They proved elusive with beaded heads, but a bit more internet searching turned up something similar. Florists pins.

How to turn them into a clip was the next, easily solved, problem. Initially I thought of simply pushing them into a polyball or similar.  A bit crude. My old friend glue-lined shrink tube came to the rescue. Put two pins in a bit of tube, grip the ends in a pair of pliers and blast the tube with a heat gun. I did some dry tests to determine how much of the pins should protrude from the shrink tube before getting the heat gun out.

The MK1 bobbin was hastily assembled from a polyball and a swivel which was also heat-shrunk onto the pins. This was just to use as a proof of concept. 

It worked a treat first time out. I had a take on one of the other rods that was dropped. It was a quiet night and that was the first take. I swapped the bobbins over and when the same bait was taken again the bobbin softly fell from the line and a 'proper' run progressed. The eel was hooked, landed, weighed and returned. Success!

Now to neaten the bobbin up. Quite simple. Chop a clip down with a pair of side cutters, glue the clip into a polyball with a swivel opposite and iMK2 was ready for action.


White polyballs show up surprisingly well after dark but I thought an isotope would be easier to see. Clear shrink tube came in handy for this. I shrunk the isotope onto the nylon coated wire I was using as a 'cord'.

The wire isn't ideal for the job. It doesn't tangle like a thin braid can, but it's difficult to get straight too. I know exactly what I do want for making the cords, it's level fly line. The original bobbins had that and it's flexible yet tangle proof. Alas I can't find any in my boxes of 'stuff that might come in handy one day', and it seems rather expensive to buy to use about three feet!

The MK2 bobbin plus isotope worked a treat. Even with the alarms switched off a falling isotope catches the eye. They looked a bit unrefined though. Not that it bothered me. I still thought I could improve things.

More searching on-line and acrylic tube was discovered. Marvelous. A 150mm piece of 4mm inside diameter tube was cut into three equal lengths. A swivel had one eye squashed and covered in the magic glue-filled shrink and then glued into one end of the short tube. A cut down clip would go in the other end. That would look a bit unsightly so to cover the eyesores I wrapped some reflective tape around each end of the tube. To stop the isotope rattling about - and to centre it - I poked a piece of foam into the tube. A dab of hot-melt glue secured the clip in place and the MK3 bobbin was ready for action.

You might ask why I didn't just use the old bobbins in the first pics on this page. The answer is that light as they are, they're not as light as the ones I've made. Simple as that. For the time being I have 80lb Kevlar braid attached as the cord until I find something better. In practice it works as well as the originals. Despite appearances the clips can be adjusted. Pulling the beads apart slackens them, twisting them around each other tightens them. The aim is to have them as slack as possible. Using 50lb PowerPro on the reels I'm finding them to work great. The line release is 'soft' for want of a better description, and I'm getting far more actual runs than the other indication methods gave me. So far!

That's the story of one of my eel fishing improvements this season. Stay tuned for a couple more! You'll have to wait a bit longer to see if I've actually caught anything....


Sunday, April 03, 2022

The Upside Down Pike Float

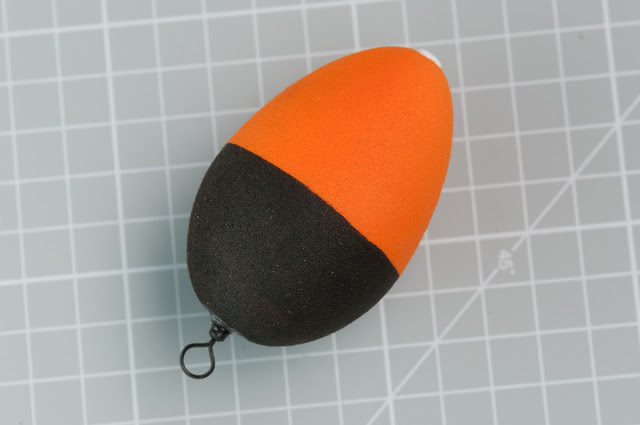
Making my foamy drifter got me wondering what other floats I could make from the orange eggs. The obvious one would be a tubed 'bung' shaped slider, but I don't use those much these days preferring bottom end floats for still water piking from the bank. My fat cigar balsa floats have done me proud for a long time now. However they have been in need of a touch of varnish here and there, and I also wanted floats I could stick starlights in for fishing after dark. I'd made some before but I like tinkering. When I saw starlight adapters at Keith's Fishing Tackle I ordered a bag of 100.

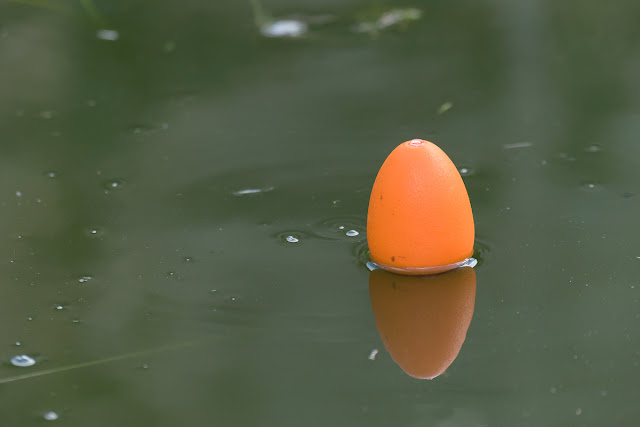
I wanted my new floats to show up better than a 'bung', which sits low in the water. So I flipped the eggs to have the pointy end up. Not being sure if this would work I made a prototype from an old polystyrene bung and gave it a try. It did work. Now to get the foamy ones made.

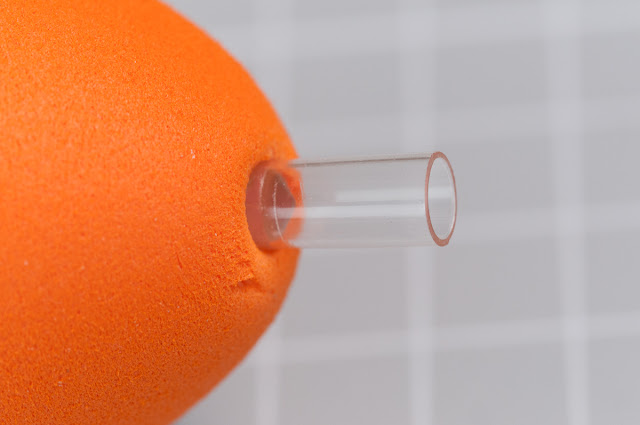
All very simple. One egg, a length of float cane or skewer, a swivel, some glue filled shrink tube, the optional starlight adapter, glue and the paint marker I used to colour the drifter body. The photos should explain the construction. 

 
The large eye swivel was used because I have a lot of them. They have proved easier to get on and off the clips I use to attach them to the rig though. I think that's mostly down to the gauge of wire used for the eye than its size. Although they are a bit easier to grip with cold, wet fingers.


Two things became apparent with this float. Firstly it sits higher in the water than I'd expected so it would be more visible with a bit less black. Or no black at all - but floats don't look right in one colour! Secondly the starlight holders are a bit finicky. At least with the starlights I used one end is a tighter fit than the other. The slack fit can be too slack.

My previous starlight floats had used the clear tube which comes with the starlights to attach them. That was always a snug fit. Gluing a tube to a dead starlight seemed an easy way to do things. For maximum light emission I left the tube standing proud after gluing the assembly into the top of a foam egg.


This worked just great. It was a bit untidy though. For the Mk2 I pushed it all the way in to sit flush, and painted a lower waterline.


For increased visibility, which I don't really need where I've been fishing, I stuck a dead starlight in a small foam ball. It was just something to play with if I'm honest! It has got me thinking about push-in vanes for a drifter though!


I think that's the end of my foamy egg float experiments. For now... It's a pity the orange ones aren't available in more sizes like the green ones are. Watch this space for green foamy ball and egg adventures!.  

Saturday, February 12, 2022

When you're on a roll

Knowing that the weather was set to turn wet for the weekend and that I'd have no time to fish next week I made sure I got a session in this week. Luckily the UPS van turned up nice and early on Thursday so I was able to get a decent length session in. I was going to fish into dark anyway to spin it out so I filled a flask, something I've not bothered doing recently just to keep the weight in the rucksack down. Fred was grateful for my effort.

I wanted to give the drifter another try out, so made my swim selection with that in mind. With a bait out close in to my left and another a bit further out to my right I started drifting. Looking at the chop on the water the float should have headed straight for an ice feature I could have inched it back from. What the wind looks like it'll do to a float rarely turns out to be what it actually does. 


Instead it spent a lot of its time blowing the drifter towards my right hand float. Eventually the wind swung a bit and I got the float just where I wanted it. Then the left hand float dipped and started to move off. When I got to the rod the float stopped moving. I have a suspicion that it was my clod-hopping tread that disturbed the pike. I checked the bait and swung it back out, a little further along the margin this time.

There's been heavy overnight rain which had made the banks muddy and slippy. The more I trudged around the swim the muddier it got and my boots were soon caked in clag.


Not having felt the hooks I had a feeling the pike would still be hanging around and up for a second bit at the lamprey head. For once I was right! This time the float kept moving and I connected. By the time I'd netted, unhooked, weighed and returned the fish the drifter had gone off course and was round the back of my right hand float.
 

It took a while to sort the mess out but at least the wind was taking the drifter out nicely by then. I was pretty confident of more action but none came my way. With an hour and a half of daylight left it was time for a move, and a switch to three static baits to take me into dark. The new swim was quite sheltered from the chilly wind and offered me three nice locations to place baits. It was, however, on a bit of a slope. A bit of a very slippery slope. Moving the rods I felt my feet lose grip and with as much grace as an ice dancing superstar I dropped the rods and pirouetted round to keep myself upright.

After a while I'd worked out where the safest route round the swim was in case I had to leap to the rods to deal with a take. The knowledge only came in handy when it was time to wind the baits in and go home.

I had a lot to do on Friday, but I was still itching to get back for more pike action. And to have another play with some floats I'd made for fishing into dark. Unusually I managed to get my jobs done in good time and was looking for a swim by two. Ideally I wanted the wind behind me but it had swung through almost 180 degrees overnight and I couldn't find a spot that would give me both a good drifting line and let me put bottom baits where I felt confident. One of my jobs had been to buy a clip-lid box to put the drifter in. It did a good job while it languished, unused, in my rucksack.

For some reason the swim I was in, with the wind blowing in to me at a slight angle, felt right. Slowly retrieving the far mackerel head a decent looking pike turned behind it about a rod length out. That made me think that a drifted bait might have scored if all the pike were as active as that chaser.Even so I resisted the urge to move. Instead I took the float and leger weight off the rig and cast the mackerel had around the swim for a few minutes. It looks strange, but I've caught on 'wobbled' half baits before. When the pike didn't reappear I reattached the bomb and float and recast it a bit further out. I'd barely sat down when the float was away.

Winding down I felt the fish. Then it came adrift. Winding the bait in I could see the trace had got round the top treble and the points were facing backwards. Bugger. Never mind, that could have been a different fish. My confidence rose another notch.

It was about an hour later the left hand float, which had been drawn back a few yards from where it had been cast, wobbled over and the line went slack. When I picked the rod up the float was moving away steadily. This one got hooked. Then kited into the reeds. Back in open water it stayed deep then made a run from the net. Time to get the mat, sling and scales out. Laid on the mat for a snap I could see from the patch of what look like regrown scales behind the gill cover that this was a repeat capture of a fish I'd caught last month. It had lost a couple of ounces - although that could be a weighing discrepancy.

Being unable to think of a better swim to move to I decided to break with my usual habit of moving regularly and chose to stick it out in this one until I'd had enough. It seemed like I'd made the right choice when the right hand margin float began to behave oddly. It was just moving away when I got to the rod when... It stopped moving. I'm becoming convinced that when fishing these margin baits a rod length away I am running the risk of spooking pike as I approach the rod. Again my thinking was that the fish hadn't felt steel so might come back. There wasn't enough time to move swims before dark fell anyway.

The sun was low and casting a warm light on the reeds when the right hand float made off more confidently. When I set the hooks I could feel that the pike was somewhere in the submerged willow branches. Once out of that potential tangle area it fought pretty well, but not being a monster was soon laying on the unhooking mat. Not a fish I recognised this time. This rig was the one I'd had the drifter on and instead of my usual quick change lead set up I'd simply attached the bomb to a paper-clip through the top eye of the trace swivel. Coming through the branches the paper-clip had done it's job as a weak link and the lad had gone.

After dark I felt like there might be another chance but after half an hour that feeling had left me, so I left the pike and the pit for home. I've caught a few pike from this place which have required the use of a headtorch for me to see what I'm doing when unhooking them. Stopping into dark hasn't paid off though. Maybe I need to stop more than an hour after sunset? Or maybe the pike don't feed in the dark. Having caught one when eel fishing in the dark I'm not too sure. I might give it another try when I can get back. It would allow me to make later starts and have a decent length session when the UPS van doesn't turn up early.


Saturday, February 05, 2022

Foamy Drifter

Drifters don't have to be used simply to get as far out as possible on huge water, they can be used to cover water on small venues, and even on them there can be places just out of casting range. Also on very shallow waters, say four feet, a standard drifter always struck me as having too long a stem for fishing baits set at a couple of feet. The standard vanes also struck me as too big and can also move the float too fast at times. On small waters a large vane isn't required for visibility in the way it is on big pits and ressies. I made my first mini-drifter back in the 1980s for fishing a shallow sand pit and it worked a treat. As with my big drifter I fished it bottom end on a boom. This set up was my preferred rig, but meant having a rod dedicated to it, or putting up with the faff of rigging it up when required. Threading the boom was a real pain when on the bank.

More recently I made a small drifter that could be used on my normal stillwater float leger without having to break the rig down. That worked but I do like tinkering. Plastic vanes have never seemed ideal to me. They crack, fall off, and are just generally crap. I've seen carbon vanes somewhere, but they struck me as unnecessarily heavy. A few years back I bought some 3mm EVA (Duplon) sheet to make an attachment for a flash gun. Why it took me so long for it to click with me that it might work as a drifter vane material I put down to a lack of interest in drifting. Or old age! last week the lightbulb lit up when I was thinking of making some more pike floats. I only had black foam sheet but gave it a try. While I was at it I bought some foam eggs and some line clips. I'd used line clips on my last model drifter so I knew that bit would work.

This was to be a cross between my previous version, which was based on a design which appeared in Coarse Angler many years ago and the much imitated ET design. First time out it did what it was supposed to do as far as drifting a bait, unclipping under pressure, and being easily swapped to a bottom end float for fishing static.

The construction is dead simple. The only tools required are a pair of scissors, a craft knife, a heat source, and possibly a fine saw. For the illustrations here I am using orange foam sheet. The materials are the EVA sheet in a colour of your choice, a foam egg, a bamboo skewer, a swivel, some 3mm glued heat shrink tube and a line clip (I used a Tackle Box own brand this time). The only glue I used was some Gorilla Glue Clear to fix the line clip in place, although I'm not sure it was required. I coloured the foam egg and skewer using a UniPaint marker pen. Less hassle than a brush or spray can!

There's not much to the construction. Colour up the skewer, or not, and push it through the pre-drilled foam egg to get the dimensions you fancy and cut it to length. Attach the swivel to one end of the skewer using the shrink tube. This is a surprisingly strong connection and I'm sure would work for making leger stems, provided long casting wasn't required.

The line clip is screwed into the foam egg just above the waterline. I didn't bother to make it adjustable but set it to a tension that I thought would unclip under a bit of pressure before screwing and glueing. If you did want to retain the adjustability then you'd have to keep the glue off the mechanism.

The egg can either be glued to the skewer, or wedged by building up the stem with more shrink tube. I opted for the latter approach on the prototype. Finally cut the vane to your preferred size from the sheet of EVA. Use the sharp end of the skewer to poke a couple of holes in it for the float stem to go through. The vane will hold in place.


That's it. This photo shows Prototype 1 in use and should explain how it is set up. A one ounce weigh is just right to cock the float and a bomb clipped to slide on the line as for a float leger might look a bit uncouth but works well enough. I'm sure the pike won't care as that's what I used to do when float trolling! The float's swivel is attached to a snap link on the line as for a float leger rig. If you're paranoid and use an uptrace for drifting the lead can be clipped to the mid-trace swivel using a paper clip which will open out should the lead snag up. Alternatively use monster split shot squeezed round an open loop of weak nylon in link leger style.

As yet this float hasn't sunk in anger. But it has been quickly swapped over to fish a float legered bait which caught a pike. And that was half of the thinking behind it's design.

Variations on the theme are, of course, possible. The same design will work at a more usual size but will require a different longer stem, probably using a different material. There's no need to use orange eggs, drab coloured ones will also work. The only concern I have is how long lasting the vanes will be. I wonder if too much abuse will see them split where they are pierced. If they do then I have a cunning plan to overcome that drawback. But given the price of the EVA sheet, it's probably easier to cut a load of spares.


Wednesday, January 10, 2018

Double first

For once both the UPS and Royal Mail drivers arrived earlier than expected. Early enough for me to throw the pike gear and some baits in the car and get to the water with plenty of daylight remaining. Even better was that the day was fairly mild, with no wind-chill. If it stayed that way I could fish an hour or more past sunset. So far so good. My usual plan hit a brick wall when I found the swims I usually end up in during my roamings were all occupied. I'd have to try something different. The area I fished on Christmas Day didn't appeal, and I didn't fancy a long walk either. Off to a swim I have fished a few times with success.

Faced with open water the third bait usually gets whacked well out and sort of twitched back. The other two fish the obvious feature. The margin. Had there been more wind I'd have got my little drifter out for a play, but that wasn't an option. As I was planning on stopping into dark I left the Mk2 night floats on.


Despite the conditions feeling favourable I wasn't happy with where I was, even though I repositioned the baits after twenty minutes. I wasn't all that confident of the rather skinny bluey I had on one rod, nor the lamprey tail on another. I moved early to a swim which had yet to produce a pike for me, as in one banked. The first time I dropped a deadbait in the left hand margin it was taken quickly by a pike which felt a fair bit bigger than the mid double I'd put pack in another swim a few minutes earlier. That's what keeps drawing me back to the swim.

I left the sardine I'd been fishing in open water and cast it to some far bank willows. Then I put a fresh lamprey head in place of the washed out tail section, which I chopped into four pieces and scattered around the head section after I'd swung it into the margin on my right. The bluey was replaced  with a small, but cucumber-smelling, smelt and dropped to my left. The sun came out.

One of the night floats I'd painted black and made a 'sight bob' for it by wrapping dayglo gaffer tape around a dead starlight. This actually showed up quite well at a moderate distance, better still at close range. None of the floats moved.


I sort of had it in mind that if any of the other anglers packed up before four o'clock I'd make a move. In the end I didn't. It seemed like sitting it out in this swim until the usually productive time when the light began to fade might be a good idea. Usually I move out of this swim to a 'banker' for last knockings. Maybe that's why the swim had never produced.

My head torch was out of the rucksack ready for action when the horse needed watering. Cue the sounder box to do what it's supposed to do... Dash to the rods and it's the lamprey head that's away. At the start of the winter I loaded one reel with Asso Bullet mono to see how it behaved. So far my few sessions proved that it cast and spooled okay, but it hadn't been tested with a fish. That was about to change. Turn the reel handle and wind straight into the pike. No problem. Another four or five pounder was coming in easily. Not much of a test for the line. I reached back and grabbed the net, sliding it forwards into the water. Now the jack was under the rod tip but for some reason was refusing to pop to the surface as I bent into it. A lunge and a swirl and I realised it wasn't a jack at all!

The first glimpse I got of the fish suggested a scraper double. A lightly hooked one at that with the lamprey section flapping around from the top treble well outside the pike's mouth. Sink the mesh and give the fish some rice. Job done. A quick look suggested eleven pounds before I wedged the net to retain the fish while I got the unhooking gear and scales sorted.

Lifting the fish ashore in the net it felt a bit heavier than my guestimate. On the mat the hook fell out. In the sling the needle spun round past six o'clock. The fish being lean across the back was what fooled me. Nicely marked and conditioned, with room to fill out before spawning she was lively on her return to the water.


I sorted the usual mess out then sat back to watch the starlights get brighter as the sky got darker. Although the air temperature had dropped markedly at sunset it didn't feel too chilly. I was quite comfortable in my bunny suit. If it hadn't been for hunger I might have stayed longer, but by five fifteen my belly was complaining.

It just goes to show that you shouldn't write a spot off until you've fished it at the most productive times. Common sense really. However, the temptation of fishing a swim which has produced on a regular basis is difficult to stay away from. It can be a bad habit to get into, though. I'd caught a first pike from a 'new' swim and a first on the mono. I'll keep on with the mono until spring, then I might use it for eels. Quite why I'm not sure when braid has so many advantages for predator fishing. I guess I just like experimenting.